")
Written by
Australian Dog Lover
15:36:00
-
0
Comments

Pets are part of our family. We always want to be able to help them when they need us, but not everything is the same for pets as it is for humans.
Nicole Rous from Shy Tiger is on a mission to help pet parents understand basic first aid skills so they can help their pet next time they’re needed. So, what are the top first aid skills all parents need to understand? Let's go through them with our helper Pickle.
#1. Basic anatomy knowledge (i.e. body parts)
#1. Basic anatomy knowledge (i.e. body parts)
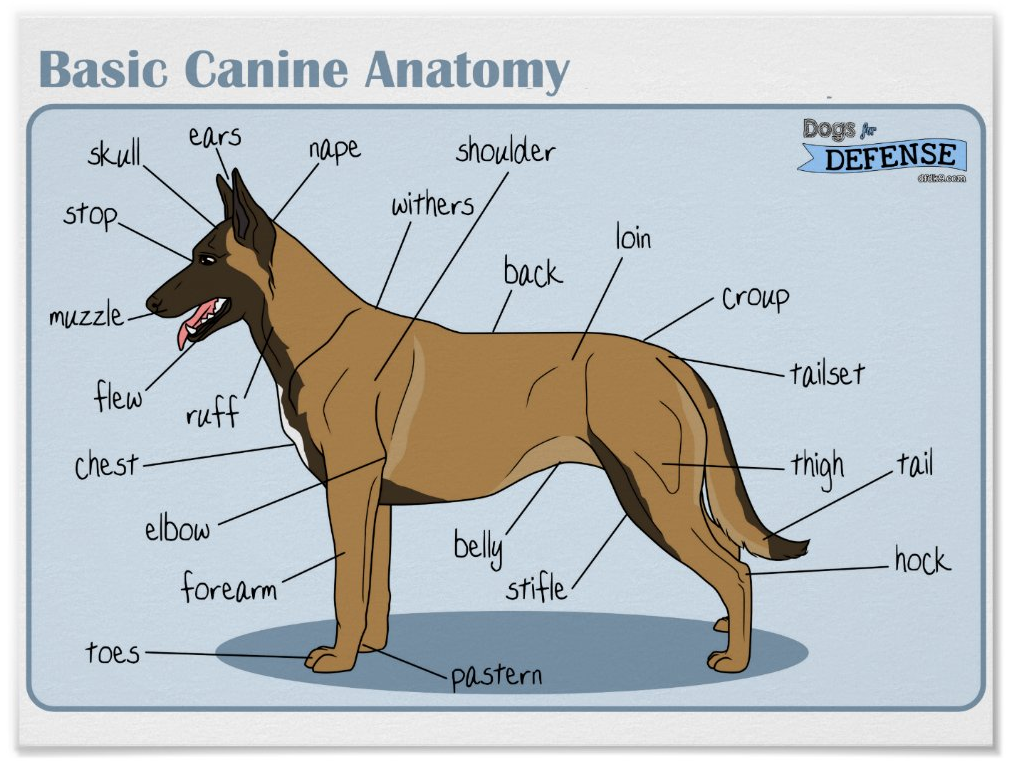
Let's be honest, pets are different to humans! They also can’t tell us what’s wrong. But, there are also a lot of similarities.
Having a good grasp of the comparison of body parts between humans and dogs helps with first aid communication with your vet and also helps to understand the implications.
Do you know where your dog’s shoulder is? And which joint is their wrist? And ankle? Did you know that dog’s have a different ear anatomy to humans?

#2. How to manage a skin wound
Skin wounds are unfortunately common. Whether it is a mishap at the dog park, or just a random event, many simple skin wounds are presented to general practice and emergency vets every day.
- The first step in managing a skin wound is to control bleeding. Use a towel or similar and apply pressure for 3 minutes.
- Once bleeding is controlled assess the wound to see if it has broken through the skin layer or if it’s superficial.
Tip No.1: A graze or small superficial skin wound (e.g. 2cm or less) can usually be managed at home. Larger or deeper wounds need veterinary attention.
- Trim any hair contaminating the wound with scissors and clean the wound with either salty water or fresh tap water (or sterile saline if you have it). Then you can apply a pet-friendly first aid wound spray.

Tip No.3: Be careful using human first aid sprays, many have toxic compounds when licked. Iodine is okay, I usually dilute in 3-4 parts water before use.
There are also some pet-friendly natural first aid sprays on the market which are preferable.
- If the wound is still bleeding or you’re worried your dog will lick it, a simple bandage is advisable, at least for a few hours.
- Cover the weeping/open area of the wound with a non-stick dressing such as melolin then secure this dressing in a circular fashion with a cotton bandage. Secure the bandage with a butterfly clip or tape.

I recommend avoiding the Vet-Wrap / coloured wraps you see vets use for home first aid as they’re too easy to place too much tension and cause swelling.

You want the bandage to be snug enough so it doesn’t slip but not too tight to cause swelling. You should be able to slip a finger under the bandage once placed but rarely 2-3 fingers.
Check your pet’s leg one hour after placing the bandage to feel for any swelling above or below the dressing. If you think there is swelling remove the bandage and either leave it off or replace it.
#3. How to manage a torn nail
Check your pet’s leg one hour after placing the bandage to feel for any swelling above or below the dressing. If you think there is swelling remove the bandage and either leave it off or replace it.
#3. How to manage a torn nail
Most of us know the feeling of accidentally cutting a nail too short or hearing the high pitched yelp when your dog is playing and then seeing a dangling nail.
Dogs are like us in that the outer hard shell of the nail is insensitive. They have an inner ‘quick’ which houses a blood vessel and nerve. So yes, when their nail bleeds it does hurt as there’s a nerve there!
Tip: If nail trimming makes you nervous try getting your dog used to a Dremel or google 'scratchpad' and train them to use one of them.
Tip: If nail trimming makes you nervous try getting your dog used to a Dremel or google 'scratchpad' and train them to use one of them.

- First step with a torn nail is to control bleeding. This usually takes longer than a skin wound so apply pressure for 5 minutes.
- Once bleeding is controlled, clean the area and trim back any hair.
- If the nail is dangling and you’re feeling confident, you can do a quick pull to remove the damaged nail (like pulling the wobbly tooth in a human that’s almost out). This may trigger some more bleeding so go back to the start of the process again if necessary.
- If the nail is firmly attached or you’re not confident, don’t pull the nail.
- Any oozing, exposed quick or damaged nail warrants a dressing (even just a temporary one). Apply the dressing to control the pain and bleeding as per the skin wound explanation and get to your vet.
#4. How to assess gum colour and refill time.
Knowing your dog’s normal gum colour is a great skill for pet parents so, if a first aid situation ever arises, you will be prepared and be able to provide useful information.

Take Home Message:
Knowing your dog’s normal gum colour is a great skill for pet parents so, if a first aid situation ever arises, you will be prepared and be able to provide useful information.

- Lift your dog’s lip or jowl to expose their gums and assess.
- Check your dog’s gum colour when they’re at rest and after exercise so you can be familiar with their range of normal.
- The next step with this is assessing their refill time as this helps understand hydration levels and how sick they are. It’s useful information to pass on to an emergency vet over the phone as well. Using your index finger push their gum with enough pressure to blanch the gum (i.e. make it go white). Lift your finger off and count how many seconds it takes to return to normal colour. Normal is less than 2 seconds.
- As with the above, perform this skill at rest and after exercise. You can practice on yourself as well.
Take Home Message:
✔️ If their gums are very pale pink or white, or dark red or yellow this is an indication to go straight to the vet.
✔️ If the refill time is over 2 seconds this is also an indication to go to the vet.
#5. Vomiting and diarrhoea basic rules
#5. Vomiting and diarrhoea basic rules
There is rarely a day that goes past that a vet will not have at least one patient present for vomiting or diarrhoea. It would have to be one of the most common reasons for pet parents to book a consultation. But when should you book that consult? When is it ok to manage at home and when does it become worthy of a vet consult?
Basic Rules:
Basic Rules:
1. My first rule is to decide if your dog is lethargic or not? Any dog that is really lethargic should be seen by a vet.
2. Next critical step is - is there any blood in the diarrhoea or vomit? Blood can be fresh (bright red) or more like digested blood (black/very dark red). If there’s blood in the vomit or diarrhoea it’s a good idea to book a vet visit.
3. If there’s more than 2 vomits in 24hrs it’s also a good idea to go to the vet.
4. If the vomiting or diarrhoea is prolonged more than 48hrs this is also another good reason to go to the vet.
Basic home management of vomiting and diarrhoea:

- Provide access to water at all times but, if vomiting, don’t allow them to guzzle, rather, small, frequent drinks are less likely to trigger another vomit.
- Food wise I prefer cooked turkey and pumpkin over the old chicken and rice scenario. The reason is chicken is a common allergenic protein these days and doesn’t agree with lots of dogs. Rice can be inflammatory for lots of dogs too and they don’t have carbohydrate requirements so it’s unnecessary. If you want to bulk out their food quinoa is a better choice over rice. Like water, I go for small, frequent amounts of food.
- Only feed approx ½ total of their normal amount whilst recovering from a vomiting/diarrhoea episode. This equates to approx 1 cup of turkey/pumpkin per 15-20kg body weight (ie. kelpie sized dog if you haven’t weighed your dog in a long time!) on sick days.
Some real life situations:
Unfortunately, over the years I have been presented with a few cases that stick out that would have had different outcomes had the owners known the first aid skills we’ve discussed in this article. I’ll outline a couple below changing the names for privacy (not their actual photos).
 Bella*, a 5-year old Burmese cat presented to us one morning with a history of vomiting all night and being quite unwell. On examination we found Bella had a burst abscess (skin infection) on her back and a strong smell.

The owners had been trying to do the right thing and cleaned her burst abscess with an antiseptic - unfortunately they chose Dettol.
When licked/ingested, Dettol can cause corrosive burns of the throat and potentially life threatening organ damage. Poor Bella was vomiting in pain and distress from these burns after grooming her burst abscess.
We were able to help Bella with pain relief, antibiotics and supportive care and she recovered. She luckily didn’t ingest enough to cause organ damage but her story could have been so much worse.
 Toby*, a 8-year old Kelpie X presented to the clinic to check a wound. The owner had been home dressing a wound on the tail of Toby. Upon examination the bandage was too tight and there was swelling of the tail above and below the dressing.

The owner had left the bandage on for 3 days without checking. Under the bandage the wound was infected and because the bandage was too tight, the blood flow to the wound was compromised which delays healing.
The frustrating part of cases like these is that Toby has been in pain for the 3 days whilst the owner believed covering the wound and stopping Toby licking was the right thing to do, and because of the delay he needed two different antibiotics to try and control the infection. Luckily he didn't lose his tail though.
Hopefully everyone reading this article takes away one useful piece of information! With a few key insights you can be empowered as a pet owner to help your pet in their next first aid situation.
Hopefully everyone reading this article takes away one useful piece of information! With a few key insights you can be empowered as a pet owner to help your pet in their next first aid situation.
written by Dr. Nicole Rous, November 2022 for Australian Dog Lover (all rights reserved)
About our writer

Dr. Nicole Rous is an integrative veterinarian of almost 15 years from Melbourne, owner of Mont Albert Veterinary Surgery.
She is also the co-founder of Shy Tiger, a natural health and lifestyle brand for pets committed to offering pets natural alternatives to help them live a longer and happier life. She loves educating pet parents to be their pet’s health advocate and truly believes that knowledge is power.
Shy Tiger has launched a Pet First Aid Kit with instructional cards & QR-linked videos - demonstrating how to perform basic first aid - and accompanied by natural first aid products and eco-friendly dressings.
 2026 Conference in Sydney – Tickets On Sale Now")
